This is to say THANK YOU to Millie and all the volunteers that help out through the year helping out those in need. Millie has been helping folks around here for 13 years now. When I first came here I didnt have anything going on. No job No income. But I did have FOOD, and that was thanks to Millie, who always made sure there was plenty of food in the boxes. Many people fall on hard times and it is very helpful to those folks when at least food is available for them and their family. People like Millie and her volunteers selflessy give thier time (and money) to help folks in need. This is such a gift to so many, Especially around the Holiday season. There were even toys available for the children in addition to Ham for Christmas dinner. Thanks to Millie and her many volunteers many of us have been able to get back on our feet and now have stable lives. Thank you Millie and Thank you to all the volunteers that help, You are ALL truly wonderful people. Hope everyone has a Joyous Holiday Season.
Happy Thanksgiving
Hope everyone has a joyous and wonderful Thanksgiving day
Another year


 Words have never been able to truly express the countless emotions we all feel. This atrocity will ALWAYS be remembered as will our sorrow to those lost and their loved ones. And our gratitude and thanks to ALL of those people who risked life and limb to help…


Free Chicago Museum Days – Summer 2015 {and Free Printable Calendar}
Chicago has some amazing museums so why not spend summer break exploring all that they have to offer? Admission can get expensive, so here’s a list of days that local museums, zoos, and gardens offer free admission. Please keep in mind that most free days only apply to Illinois residents with valid identification and only apply to general admission, not special exhibits or events.
To help you plan for summer vacation, go to http://toddlingaroundchicagoland.com/2015/06/free-chicago-museum-days-summer-2015-and-free-printable-calendar/ and download a free printable calendar with all the free museum days on it!
Adler Planetarium – June 3, 4, 5, 10, 11, & 12
Alfred Caldwell Lily Pool – Free daily
Art Institute of Chicago – Every Thursday evening from 5:00 pm-8:00 pm
Brookfield Zoo – No free days in until October
Cantigny Park – Free admission daily; $5 parking ($2 parking after 4:00 pm)
Chicago Botanic Garden – Free admission daily; $25 parking on weekdays, $30 on weekends
Chicago Children’s Museum – Every Thursday evening from 5:00 pm-8:00 pm
Chicago History Museum – July 4, August 17, 18, 19, 20, 21, 24, 25, 26, 27, 28, & 31, September 1, 2, 3
Cosley Zoo – Free daily for all Wheaton Park District residents and for children 17 and under
DuSable Museum of African American History – Every Sunday
Field Museum – June 4, 5, & 8, August 11, 12, & 13, September 3, 10, 11, 12, 13, & 20
Garfield Park Conservatory – Free daily
Klehm Arboretum & Botanic Garden (Rockford) – First Tuesday of each month (although donations are appreciated)
Lincoln Park Conservatory – Free daily
Lincoln Park Zoo – Free daily
Morton Arboretum – Discounted admission on Wednesdays
Museum of Contemporary Art – Tuesdays
Museum of Science & Industry – June 1-5 & 8, September 8, 9, 10, 11, 14, 15, 16, 17, 18, 21, 22, 23, 24, 25, 28, 29, & 30
National Museum of Mexican Art – Free admission daily
Oak Park Conservatory – Free admission daily; donations are accepted ($2 per person is recommended)
Peggy Notebaert Nature Museum – Thursdays are free, but donations are suggested
Shedd Aquarium – June 1, 2, 8, 9, 15, & 16, September 8, 14, 15, 21, 22, 28, & 29
Swedish American Museum – Second Tuesday of every month
Chicago Public Library branches have passes to several different museums through the Kids Museum Passports that Chicago residents can check out for free. Residents of many suburbs can get free admission with the Museum Adventure Pass at their local library.
Spring Forward!!
Just a reminder that this Sunday, March 8th, Daylight Savings Time begins! Don’t forget to spring forward at 2:00 am and turn you clocks ahead an hour!
http://news.yourtown2.com/2001/
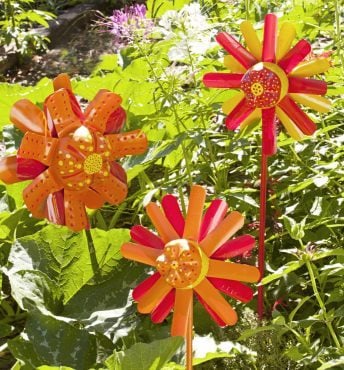
As promised, here is the garden idea recycling plastic bottles. This project is #1 on my list for this spring and I can’t wait to do it! Here is the list of what you need:
- 2 or 3 same-size plastic soda bottles
- Waterproof permanent adhesive
- Gloss spray paint for plastics
- Small scrap of Styrofoam block
- Scrap of colored foam for backing
- 3/8-in.-wide x 24-in.-long wooden dowel rod
- Opaque permanent paint markers
- Paper-backed duct tape sheets (optional)
- Scissors or craft knife for bottle trimming
- Flexible ruler
Step-By-Step Instructions:
Step 1
Wash the bottles and let dry. Use a flexible ruler and permanent marker to make an even circular line as a cutting guide about 1/3 of the way down from the tops. Cut and discard top portion of bottles, keeping the bottoms to make the flowers.
Step 2
Place bottles upside down on scraps of cardboard or newspaper in a well-ventilated area. Stand the dowel rod in the Styrofoam block to make it easier to paint. Following manufacturer’s instructions, spray-paint exterior of bottles and dowel rod. Apply as many coats as needed for complete coverage. Let dry and remove the rod from the Styrofoam.
Step 3
Using a permanent marker and flexible ruler, lightly mark sections evenly around perimeter of each bottle for flower petals. For small bottles, mark about every 1 in.; for larger bottles, mark about every 2-1/2 to 3 in. Use scissors or a craft knife to cut vertical slits on marks, making several flower petals. Stop cutting each slit at the ridged base of bottle bottom. If desired, trim ends of petals into rounded shapes.
Step 4
Bend the petals forward so they’re at right angles to the center of the flower (the bottle bottom), creasing each one at the ridged base of the bottom. If needed, bend and press firmly several times until the petals stay in place.
Step 5
Using permanent adhesive, attach the bottles by stacking bottoms with petals outward. Stagger the placement of petals. For inner bottles, bottoms may have to bend slightly to fit inside outer bottle. Let adhesive dry.
Step 6
If desired, cut a 1-1/2- to 2-in. strip of duct tape to fit the perimeter of the top flower’s center. Decorate the center of the flower using the paint markers.
Step 7
Attach the dowel rod. For larger stacked bottles, cut small crisscross slits through the side of the middle bottle. For smaller stacked bottles, cut a small V-shape slit from the back edge of the last bottle. Put one end of dowel rod through slit, running it across the width of the bottle bottom until it meets the opposite inner side. Use permanent adhesive to glue dowel rod in place at both sides. Let adhesive dry.
Step 8
Cut a circular piece of colored foam slightly larger than the opening on back of flower and secure it with glue around the edges. Let it dry.
Stick your soda bottle flower a few inches into the dirt, indoors or out. No need to water it!