Just a reminder that this Sunday, March 8th, Daylight Savings Time begins! Don’t forget to spring forward at 2:00 am and turn you clocks ahead an hour!
Category Archives: Whats New
Whats new in the world
http://news.yourtown2.com/2001/
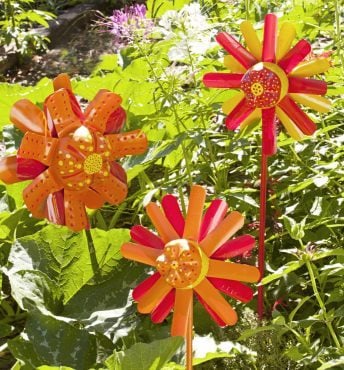
As promised, here is the garden idea recycling plastic bottles. This project is #1 on my list for this spring and I can’t wait to do it! Here is the list of what you need:
- 2 or 3 same-size plastic soda bottles
- Waterproof permanent adhesive
- Gloss spray paint for plastics
- Small scrap of Styrofoam block
- Scrap of colored foam for backing
- 3/8-in.-wide x 24-in.-long wooden dowel rod
- Opaque permanent paint markers
- Paper-backed duct tape sheets (optional)
- Scissors or craft knife for bottle trimming
- Flexible ruler
Step-By-Step Instructions:
Step 1
Wash the bottles and let dry. Use a flexible ruler and permanent marker to make an even circular line as a cutting guide about 1/3 of the way down from the tops. Cut and discard top portion of bottles, keeping the bottoms to make the flowers.
Step 2
Place bottles upside down on scraps of cardboard or newspaper in a well-ventilated area. Stand the dowel rod in the Styrofoam block to make it easier to paint. Following manufacturer’s instructions, spray-paint exterior of bottles and dowel rod. Apply as many coats as needed for complete coverage. Let dry and remove the rod from the Styrofoam.
Step 3
Using a permanent marker and flexible ruler, lightly mark sections evenly around perimeter of each bottle for flower petals. For small bottles, mark about every 1 in.; for larger bottles, mark about every 2-1/2 to 3 in. Use scissors or a craft knife to cut vertical slits on marks, making several flower petals. Stop cutting each slit at the ridged base of bottle bottom. If desired, trim ends of petals into rounded shapes.
Step 4
Bend the petals forward so they’re at right angles to the center of the flower (the bottle bottom), creasing each one at the ridged base of the bottom. If needed, bend and press firmly several times until the petals stay in place.
Step 5
Using permanent adhesive, attach the bottles by stacking bottoms with petals outward. Stagger the placement of petals. For inner bottles, bottoms may have to bend slightly to fit inside outer bottle. Let adhesive dry.
Step 6
If desired, cut a 1-1/2- to 2-in. strip of duct tape to fit the perimeter of the top flower’s center. Decorate the center of the flower using the paint markers.
Step 7
Attach the dowel rod. For larger stacked bottles, cut small crisscross slits through the side of the middle bottle. For smaller stacked bottles, cut a small V-shape slit from the back edge of the last bottle. Put one end of dowel rod through slit, running it across the width of the bottle bottom until it meets the opposite inner side. Use permanent adhesive to glue dowel rod in place at both sides. Let adhesive dry.
Step 8
Cut a circular piece of colored foam slightly larger than the opening on back of flower and secure it with glue around the edges. Let it dry.
Stick your soda bottle flower a few inches into the dirt, indoors or out. No need to water it!
Happy Valentine’s Day
Happy Valentine’s Day from For The Record!
We hope you are able to share the day with loved ones.
Garden Art Ideas
Last week I posted two of my favorite projects from Pinterest that I plan on doing this spring, and thought it would be fun to add a few more this week. Enjoy and I hope these posts get your creative juices going!
I love commemorating memories in a crafty way, and I found a perfect way to do this and have it outdoors. Plus, it is is a great way of using up all the scrap pieces of wood from my husband’s projects that are always laying around…lol. All these wood scraps have turned into an enjoyment of using them is all kind of craft projects, and I love this idea.

As you can see in this picture, make small signs of all the places you have travelled! You can slowly build and add to it as you go places. Let your imagination fly as you create each sign – part of the charm is that they are not all the same color. And on the one I am going to make I’ll mix up the fonts as well. One hint as this will be outdoors – after you are done with the painting of each sign and it has dries, heavily coat it with a clear acrylic sealer. I use the kind you get in a spray can.
I love garden art, and this year I want to make a few pieces to put in mine. I’ve been gathering ideas, and I love the one pictured below. I found this on a website, but thought this could easily be made. Just find a narrow stake, some thin and pliable wire (I plan on using baling wire to see how that will work), and of course beads. You could use a color theme, or mix and match as is pictured. Use large, flat ones to seal off the top and you will need something to use for a “plug” . I have a short, hollow piece of metal I am going to use and then once all the wires are inserted will seal it off with Gorilla Glue or use my hot glue gun. Imagine watching the colorful beads dance in the breeze and capture the sunshine!

- The picture posted with this post is a preview of one of next weeks projects. 🙂
A Cure for Winter Blahs!
If you are like me, this time of the year I start getting the winter blahs and start thinking of spring and my flower gardens. The other day I spent some time on Pinterest looking for “garden art.” I found some really easy, fun ideas I wanted to share!
The first one that caught my eye looked so cute and easy! Called Garden Whimsies, they are made with terra cotta pots and saucers. Simply paint the pot in one color and paint the saucer in a contrasting color, when dry paint dots on them! They will look like darling mushrooms for your gardens!!
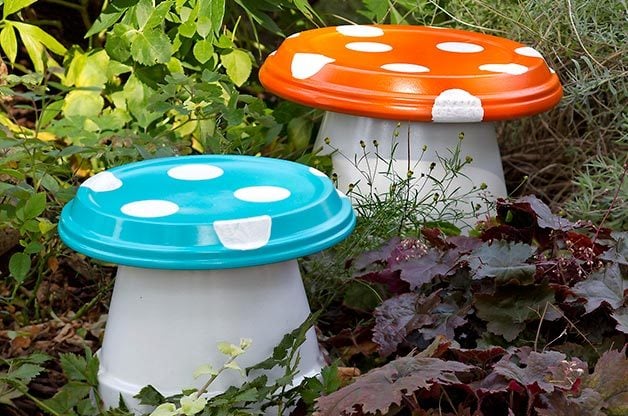
Easy and Colorful!!
I LOVE gazing balls and came across this idea on making your own mirror balls. What really attracted me to this idea is using recycled items, such as old bowling balls. The only other thing you need is a can of Chrome Metallic spray paint that you can get at Hobby Lobby or any crafting store!! So much cheaper than buying something like this at a store!

Clean whatever ball you are going to use with rubbing alcohol before painting, then lightly spray one side and let dry. Roll the ball to the other side and spray that side. Repeat as often as you like to achieve the amount of reflection you want. Spray with a clear gloss when the paint is dry, and that is it!!! One can of spray will make 3 balls, the size of a bowling ball.
Be creative when displaying these shiny, mirror balls. You can put them on a pedestal, an old bird bath, or as displayed above and place them strategically throughout your yard and gardens. Imagine the sparkle that will be added to your yard and gardens!
Have fun with the above projects!! There will be more to come!!
Great bargains on trees, fish, rain barrels, native plants, more
Looking for a great deal on trees, plants, even bluebird houses for your yard? Or maybe you are getting into recycling all that rain water by utilizing a rain barrel! Check out the information below from the Paxton Record:
The Ford County Soil & Water Conservation District is selling rain barrels, fish, trees, native plants, wood duck houses and bluebird houses.
Rain barrels — The order deadline is Feb. 26. Fifty-five-gallon plastic barrels, formerly used for food product shipping, have been modified into rain barrels that are 35 to 42 inches tall. They are assembled with a spigot, with linking fitting at the bottom end, overflow fitting near the top and a screen enclosure for the top. The rain barrels come in black, grey, blue or terra cotta colors at a cost of $65 each. Accessories available include: a linking hose, flex elbow, rain water diverter and wooden pedestal riser.
Fish — The order deadline is March 13 for grass carp and March 23 for all other fish. People can call the SWCD office at 379-2372 to ask about possible deadline extensions. Pickup is at 11 a.m. March 30. Available for purchase in various sizes are catfish, sunfish, bass, bluegill, redear and minnows. Pond delivery is available for orders of at least 1,000 fish or 250 pounds of catfish.
Trees — The order deadline is April 6, and pickup dates are April 10 for balled and burlap trees and April 20 for all other trees. Available for purchase are evergreens, hardwoods, shrubs, in-potted plants and bare-root seedlings. Also, a variety of fruit trees are available for $28. Grasses are on sale for $9.75 per plant in one-gallon pots. Evergreens are available in larger sizes for $30 apiece. The supplier also has many other items available upon special request.
Native plants — The order deadline is April 15, and the pickup date is May 29. Native plants come in a variety of colors, bloom periods and sizes. The plants cost $2.75 each and range in height from 2.25 inches to 2.5 inches.
Wood duck houses — People who own a pond and want to enhance the wildlife quality are encouraged to buy a wood duck house. The wood duck houses are 31.5 inches by 17 inches and are made of either pine or cedar. Pine wood duck houses cost $50, and cedar wood duck houses cost $65.
Bluebird houses — The bluebird houses are 28.5 inches by 12 inches and are made of either pine or cedar. Pine orders cost $20 and cedar orders $30.
To obtain order forms, visit the Ford County SWCD office in the USDA building at 1380 W. Ottawa Road, Paxton, or call 379-2372, Ext. 3.